
Anywho, she recruited me for my super good looks and mad skills....kidding I do have mad skills in making cool stuff for cheap! So, we have been working on some stuff.
Scored this light from craigslist, it's brass and old and awesome.
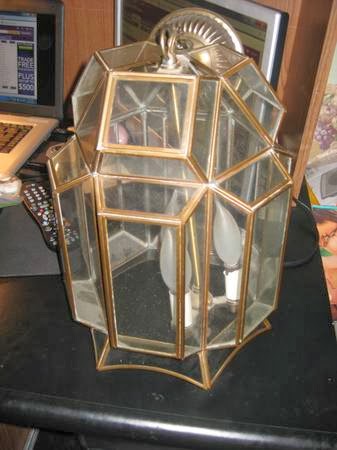
I cleaned it up and it was lovely. But, it needed to be a plug in light and the light bases were falling apart. In steps some glorious neon pink duct tape.
Now, I am going to teach you how to rewire a chandelier to make it plug in.
It's super easy...I may be plotting to do this to a few lights. Don't judge.
DISCLAIMER: I am not an electrician. I did this myself. I am telling you how I did it. I am in no way responsible if you fuck yours up and burn down your house.
REWIRING A CHANDELIER
1. Collect your supplies: chandelier, wire strippers, needle nose pliers, a lamp kit from Lowe's (for the switch), electrical cord for your needed length, duct tape to cover the cord when finished, and electrical tape (it's must be electrical tape, no duct tape won't work for that part)
.JPG)
.JPG)
2. Cover the light bases with duct tape.

3. Cut cord to decide where you need the switch. You may skip this part if you don't need a switch. Her plug was behind a bookcase and we needed it to be able to be turned on without having to plug it in every time. Pull apart the wires with some pliers and wire strip the ends.
.JPG)
4. Join the ends together by twisting them like so, it doesn't matter which side you connect it to, just keep each side of the cord separate.
.JPG)
5. Now tape each exposed wire with electrical tape. You are going to be super excited at this point. After each connection has been made, (I had to do it in 4 spots) and all the electrical tape is on PLUG IN THE LIGHT!!! Do not wrap in duct tape until you have plugged it in. If it doesn't work you are not going to want to undo all the duct tape. I luckily thought of this ahead of time.

6. Sit back and realize how cool you are, text your friend pictures of her light. Seriously. Awesome.
Now recruit someone to assist you (I made Morgan and Hayley help hold it, child labor is free, woot woot!)
and cover the cord in duct tape. I didn't get a pic of this step because all the hands were holding the cord so the tape didn't get covered in Harley's dog hair!
Before I show you the finished product, I have to show you one more addition to this light for her dining room. My mom bought 2 packs of these dots at a garage sale, each pack had 4 sheets of dots.

I spray painted the dots gold and..............drum roll..................

It turned out so amazing!!
Plus the Brass Folding Ghost Chairs I found on Craigslist found a home at her place. They are perfect for her house!
.JPG)
We are also working on her bar cart and this gallery wall, she has to finish up her TV stand to make sure it doesn't conflict with the height of the art. :)
.JPG) |
| henry the pug wants you to know only you can prevent forest fires and he'll eat the rest of that if you are done with it. |
xoxo

My apartment is famous! I can't wait for rugs and to get art on the walls so I can take awesome after photos!
ReplyDelete